breaking down the wysiwyg editor

Chantel Keith
6 minutes
what you see is what you get.
The experience of using a WYSIWYG editor can be a polarizing one. Depending on how familiar you are with its functionality, you’ll find it’s either quite daunting to use or an extremely powerful tool in the world of web production. Seeing as the WYSIWYG editor has been around for nearly half a century, it’s not likely to disappear any time soon. Today, we’ll be breaking down the most common tools found in WYSIWYG editors with various tips and tricks to help you make the most out of them.
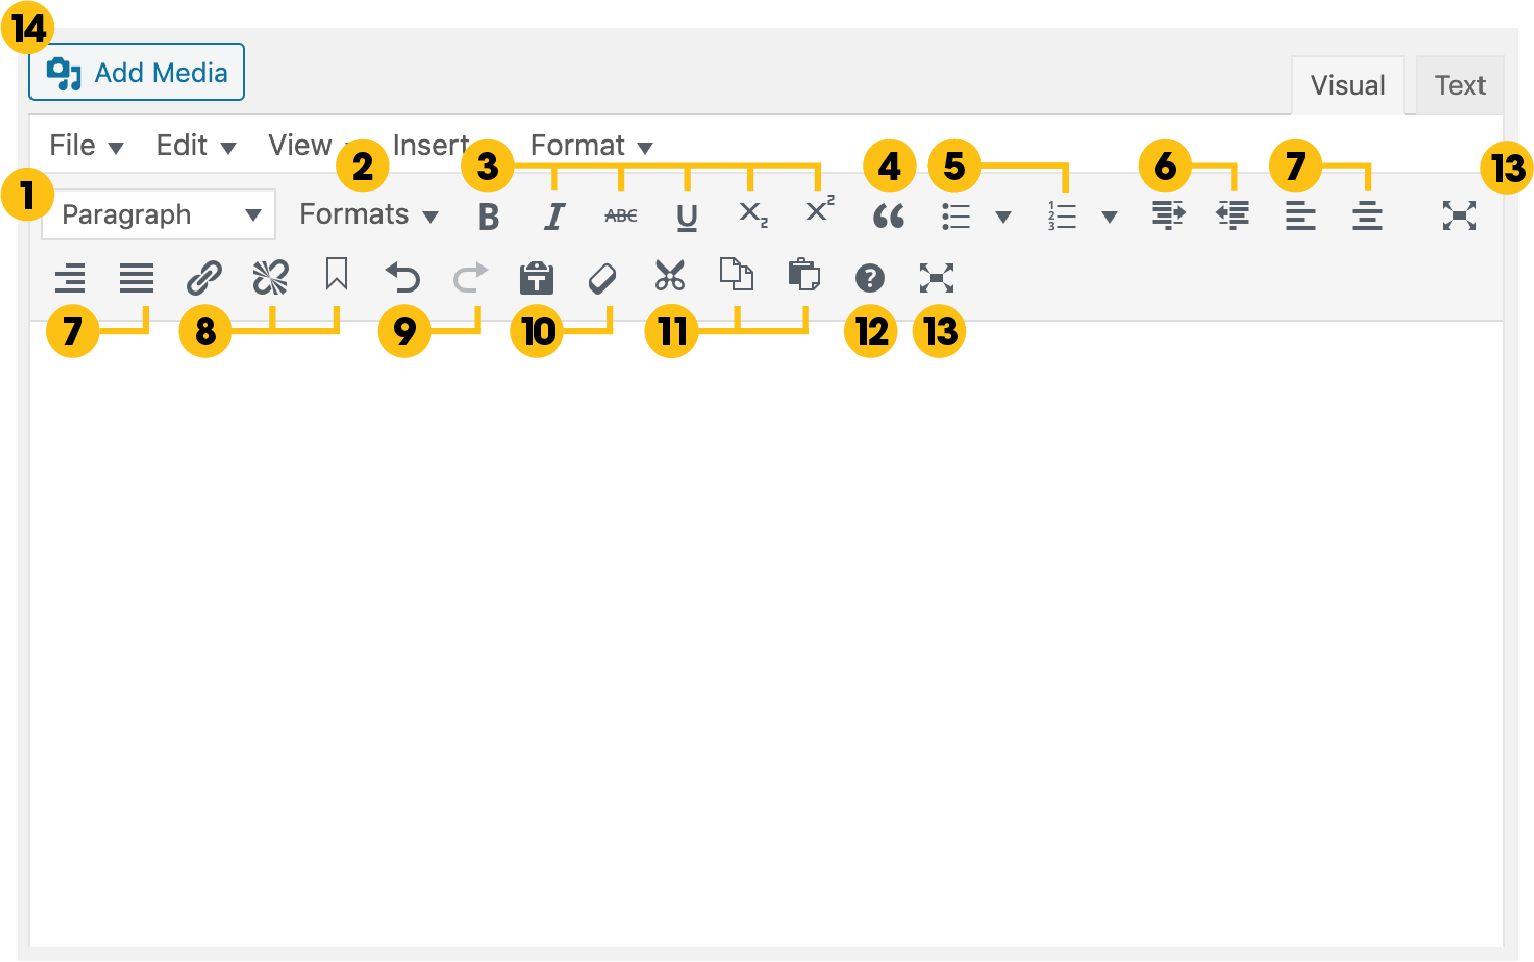
1. Paragraph List Box
Contains various options to format your text from a Heading 1 to Heading 6 or as regular paragraph (body) copy. The formatting will take on the styling applied in your website’s theme and it’s important to keep the formatting (and styling) consistent between your page templates.
2. Formats List Box
This is where all of the custom formatting options are stored that aren’t provided by the default WYSIWYG tools. They give you a preview of what the styling looks like when expanding the list box and helps apply custom formatting for various link styles, buttons and even images. Simply highlight the text, image or element you’d like to format in the editor and select an option from the list box.
3. B I U S x2 and x2
These are the standard formatting tools found in almost every editor used to bold, italicize, underline, or add a strike through your text. You can also apply subscript or superscripts with these tools.
4. Blockquote
To format your text as a quote, simply highlight the quote’s text and apply the “Blockquote” tool. This text will then take on the styling implemented in your website’s theme.
5. Bulleted and Numbered Lists
Turn your copy into either a bulleted list or a numbered list by highlighting the copy and clicking the “Bulleted Lists” or “Numbered Lists” tools. New lines of text will automatically be formatted as another list item, until pressing your ENTER key twice to break out of the list formatting.
Bonus: use these in combination with the Text Indent tool to neatly nest bulleted copy.
6. Increase Indent and Decrease Indent
These tools can add or remove indents on specific text areas. These are often used in combination with the Bulleted and Numbered List formatting above to nest multiple list items.
7. Text Alignments
Control the alignment of your text, tither aligned to the left, the center, or to the right. You can also justify the text, which adds small amounts of whitespace between each work to ensure the text fills the whole horizontal width of the container.
8. Linking Content
Add or remove links by highlighting the text & clicking the “Insert Link” or “Remove Link” icons. You may choose to link to an existing WordPress page or add a custom URL target, and can toggle the link to open in a new tab in the visitor’s browser if you prefer to leave the current page open on click.
You can also create an “Anchor Link” by placing your cursor at the start of the paragraph to link to, then click the Anchor icon and type in an “ID” for this section. You can then use this in combination the the “Insert Link” tool by adding a hashtag (#) followed by the anchor ID, which will create a link to the anchored section.
9. Undo/Redo
These tools allow you to undo or redo any changes made in the WYSIWYG editor. You can also simply refresh or navigate away from the page to completely scratch any changes if you decide not to save them.
10. Paste as Text and Clear Formatting
One step that often trips our editors up is when copying and pasting text from a Word document, email, Google doc, etc. Unfortunately, any formatting that previously existed on those elements is often copied into the WYSIWYG editor which can cause undesirable effects being applied to the text such as bolding, font size changes, line breaks, etc.
The simplest way to prevent this from happening is by using the “Paste as Text” tool. Simply click the “Paste as Text” icon before pasting your copied text into the editor.
Alternatively, you can copy & paste your text into the editor, then highlight the text and apply the “Clear Formatting” tool which will also remove any prior formatting.
11. Cut, Copy and Paste
These are the standard formatting tools found in most editors to cut text, make a copy, and paste text. You can use these to create new lines of text with existing formatting within the current or other WYSIWYG editors on the page which can be quite useful to save time reapplying formatting.
12. Keyboard Shortcuts
Provide a list of keyboard shortcuts to make editing even faster. Simply hold the CMD key on your keyboard and type the desired shortcut.
13. Fullscreen
When editing large amounts of content, it can be helpful to open the fullscreen view which allows the editor to take over your full browser window giving you optimal space for making edits. Simply click the “Fullscreen” icon to open the fullscreen view and click it a second time to close the fullscreen view.
14. Add Media button
Specific to WordPress, the Add Media button is very useful for adding images into the copy in your editor. Simply place your cursor in the desired area for the image, then click the “Add Media” button to open up your sites Media Library. Locate the image to add and click the “Insert into Page” button to add it into the editor. You can then apply other formatting to the image where it’s a custom format in your Formats List Box or applying a text alignment to the right/left/center.
Bonus:
The last tip doesn’t have a specific tool and isn’t mentioned in they Keyboard Shortcuts, but we often find ourselves using when adding multiple headings or other content. By using CMD and ENTER keys on your keyboard, you can create a new line in your text without creating a new paragraph. By default, using the ENTER key on your keyboard will automatically create a new paragraph; however, this isn’t always what we want to happen. When you’re just looking to create a new line break, for example to add a Heading 1 under a subheading, using your CMD key and the ENTER key will move your cursor to a new line without adding an entirely new paragraph allowing for subheading – or second line of text – to be directly underneath the first line without additional spacing being added on the front end view.
Keep in mind, the tools available in your website’s WYSIWYG editor may differ from the ones mentioned above. We’ve found these to be the most common tools used in modern editors and hope the fundamentals of how to use each tool can apply to your website’s WYSIWYG editor as well, even if the look of your editor, the icons or the tools themselves may differ.
More
insights
Lorem ipsum dolor sit amet, consetetur sadipscing elitr, sed diam nonumy eirmod tempor.
©2025 300FeetOut All Rights Reserved | Privacy Policy